EXTRA 10 % OFF AREZZO WITH CODE: AREZZO10
*Free delivery on orders over £499
How to Change a Radiator Valve
How to Change a Radiator Valve
Whether your current radiator valve is faulty or needs replacing with a new valve or thermostatic valve, this article will show you exactly how to change a radiator valve!

So, the temperature has dropped outside, and it’s time to turn on the radiators in the house, but the room isn’t getting any warmer. After a bit of fiddling around, you realise that your radiator valves have stopped working and you’re going to to have to replace them. The problem is, just like most people, you don’t know how to change a radiator valve.
When to Change a Radiator Valve
Whether you want to know how to replace a radiator valve because it has stopped working or you’re replacing a manual valve with a thermostatic radiator valve, your old valves have started to look a bit outdated and need updating, or they’re leaking, this simple guide will show you, step-by-step, how to change a radiator valve.
Whatever reason you have for replacing your radiator valves, we’ll guide you through the process in six easy steps. We’ll also show you how to change a radiator valve as well as explaining how to drain the system.
As with any type of plumbing DIY, you should already have some knowledge or experience before attempting this. We do recommend you use a professional if you've very little DIY experience and know how, or if you're not feeling confident enough to carry out a job like this.
Below is a diagram of a typical radiator with a valve.
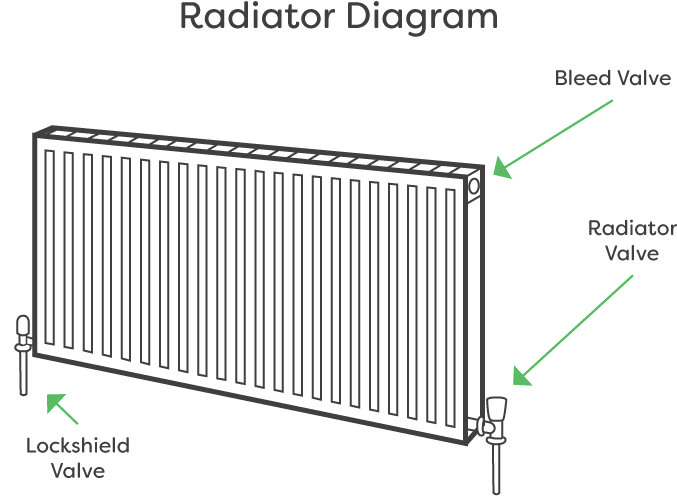
Depending on the radiator that requires the valves to be replaced, there may be a slight difference in how the valves are connected. Some are fixed in the wall, while others are connected to the water pipe coming up through the floor. Traditional heating options such as column radiators tend to have the valves connected to a water pipe from the floor (as in the diagram above), while some modern heating options, such as ladder towel rails, may have valves that are fitted from the wall.
Replacing a radiator valve is not a difficult task, but it can require a little bit of technical know-how, so as always, we recommend that you seek the help of a heating engineer if you’re unsure or lack DIY experience.
How does a radiator valve work?
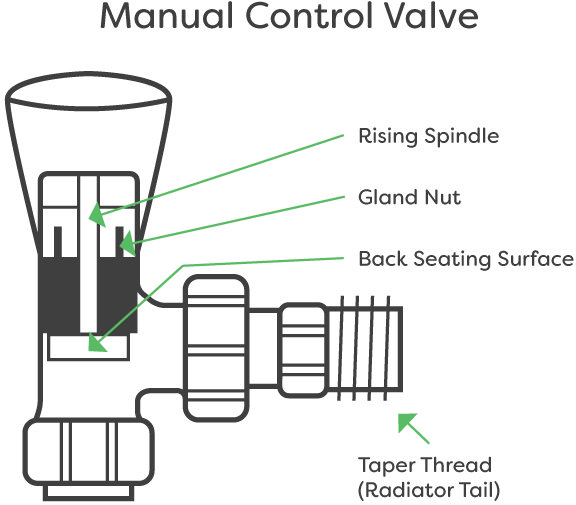
There are two common types of radiator valves: manual valves, which require human interaction when changing the temperature settings, and thermostatic radiator valves, which regulate the temperature themselves.
Below is a diagram of a manual radiator valve.
Manual Valves
A manual radiator valve is turned by hand and works just like a tap would: by altering the flow of hot water travelling from the boiler into the radiator. The higher the setting, the higher the volume of hot water that enters the radiator, producing greater heat output. When the desired temperature is reached, you will need to go to the radiator and change the temperature setting for a warmer or cooler temperature. Manual valves, if left on high settings, can create higher heating bills; hence, many of us turning to thermostatic radiator valves nowadays.
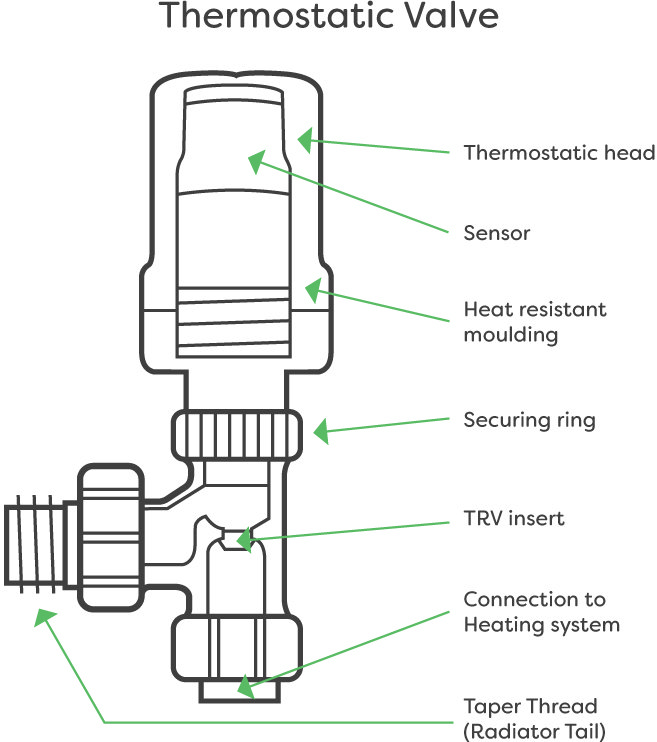
Below is a diagram of a thermostatic radiator valve (TRV).
Thermostatic Radiator Valves
Also known as a TRV, a thermostatic radiator valve features a temperature sensor. This sensor switches off the heating when the desired temperature is reached automatically and then turns it back on when the temperature dips to ensure a constant and much more accurate temperature. If we use the spring version as an example (there are two types of TRV; the other version has a wax jacket and works in a similar way), it works by monitoring the temperature of the room. When the room is hot, the metal spring expands and plugs the gap where the water comes through (the seat). When the radiator cools down because it doesn’t have a steady flow of hot water, so should the room, and when the room does become cold, the metal spring contracts and reopens the sealed gap, which causes the flow of hot water to commence.
A thermostatic radiator valve can save you quite a lot of money each year in heating bills and is certainly advised for most households.
If you are changing your radiator valves from manual to thermostatic, please ensure you leave one radiator with a manual valve to ensure there is always a constant flow through the central heating. For more information on why this is important or if you haven’t already chosen a valve for your radiator, then take a look at our guide ('which radiator valves should I buy?') for all the information you need.
How to change a radiator valve
What you will need
● Towel
● Container for collecting water drops
● Hose
● Jubilee clip
● Hex key
● Plumber's wrench
● Adjustable spanner
Depending on your actual setup, you may require more or less tools than those listed, including PTFE tape (also known as thread seal tape), which can help stop leaks. If you do use thread seal tape in your radiator pipework, make sure you apply it in a clockwise fashion; this will ensure it stays on when you screw on the valve.
Please note that this is a general how to guide that has been written to help you change a radiator valve; although we've tried to make this universal, your setup may differ, and you should check with your valve manufacturer's instructions before proceeding. If you are unsure at any point, then please consult a professional.
Changing a radiator valve is easy when you follow these six simple steps. If you don’t need to remove a radiator valve and just want to fit a new valve to an existing pipe and radiator, then jump to step 4.
Step 1. Switch off heating system and shut off water
This method is perfect for combi boiler systems, but if you have a conventional system (a conventional cylinder tank system), you’ll require help from a registered heating engineer.
Before we change the radiator valve, we’ll first need to isolate the water supply. When we shut off the water, it’ll no longer enter the boiler, and this could cause it to overheat and burn out the pumps, so we’ll also need to switch of the heating system too.
● Electrically turn everything off to be on the safe side
● Turn down all room thermostats
● Make sure programmers are not calling for heat
● Make sure system won’t start up
Step 2. Locate the drain off
The drain off is usually located at the lowest point in the house. You’ll need a hose at this that point will connect to the drain off, and then you’ll want the other end of the hose to be outside, ideally where the water can run off into either soil or an outside drain. Open the drain cock, and when it’s empty, you’re ready to change the radiator valve. A jubilee clip can be used to fasten the hose to the drain cock to prevent any spills.
Before you start this drain valve, if you open the air valve, you’ll be able to hear air entering the radiator, which will mean that the radiator is emptying of water. Now wait for the water to have completely drained; this can take around 10 minutes but can be quicker or slower.
● Put a towel underneath the valve for small drips
● A bowl (that can fit underneath the radiator) will help catch larger volumes of water left behind
Step 3. Remove the old radiator valve
Undo the top nut on the radiator valve, and then undo the bottom nut, which will allow you to take the valve off completely. You may require the wrench at this point to hold the valve body. There will be a little bit of water that runs out, so ensure you keep the towel underneath to prevent wetting the floor, as the water can be a little dirty.
Using a hex key (hexagonal radiator spanner) or the plumber’s wrench, remove the chrome tail that connects the valve to the radiator. It may be hard to turn, so grab a spanner to help create some leverage to get it to turn. If the water from the water pipe seems to be flowing a little too much, when you do take off the radiator valve, pop the valve back on the pipe and allow it to just empty into the container before moving on to step 4.
Before replacing the radiator valve, you may want to just give the area a clean.
Step 4. Fitting the new radiator valve
Now we're going to explain how to fit a radiator valve, both manual and TRV valves. Whichever one you're fitting should be covered.
Fit the new chrome radiator tail where the old one was removed, and remember to use PTFE tape if you want to minimise the risk of leaks. Slide the nut and olive onto the radiator tail. Locate your water pipe, and then slide on the nut and then attach the olive. Take your new radiator valve body and connect it to the water pipe while lining it up and inserting it into the radiator tail. This can be a bit fiddly, so please be patient.
Once the body is in place, tighten up the nut on the tail and then the bottom of the water pipe.
Once they’re tight (but not overly so), remove the protective cap from the top of the valve body. This is usually screwed on, so simply unscrew it. Now take the top of the valve and connect it to the valve body. Once it’s on, you’ll want to just gently tighten up the nut a little. Be careful not to overtighten it. If you're using tools to tighten up nuts, then you could use a bit of cloth so that the finish of the valve isn't damaged in anyway.
Step 5. Turn the mains water back on
Once you've tightened everything up, it’s time for the moment of truth. Close up all the radiator valves that you’ve opened, including the bleed valve, which is located at the top of the radiator.
When you turn off the lockshield, remember how many times you need to turn it for it to close, as this will need to be opened up exactly the same amount later. If you don’t make a note of this and forget, then you will probably need to rebalance the system later.
Now turn the water back on and refill the system, keeping an eye on the new joints for leaks. Once you’re happy, open the new radiator valve up, so that water can flow into the radiator and check for leaks once more. If there are no leaks, then everything should be fine.
Step 6. Bleed the radiator
Once you’re happy that the radiator and valve aren't leaking, open up the bleed valve to let out any air that may be trapped inside the radiator. This air will prevent the water from filling the radiator.
Now open up the lockshield valve, checking with your notes from Step 5 for the exact number of revolutions (turns), and the water will be able to flow once again.
You can now connect the power back to the boiler and get it up and running again. Once the heating has been running for an hour or two, go around the radiator one last time to ensure everything is working perfectly.
● Drain off valves need to be turned back off
● Air valves (air cocks) need turning off
● Water mains need to be turned back on
● Bleed the radiators
● Check the joints you’ve been working on and ensure there’s no leaks
Your radiator should now be heating up and working perfectly if it wasn’t before. If you replaced the radiator valve because the old one was outdated or worn, then I’m sure you’ll be pleased with your new, shiny valves.
If your radiator still isn't working after this or you're thinking of replacing it with a new one then why not take a look at our wide range of radiators, or read our guide to smart heating systems.

Sarah
Sarah is one of our resident bathroom experts here at Victorian Plumbing. She loves writing helpful bathroom design and DIY articles, as well as detailed buying guides.
